Wednesday, August 31, 2011

For the Sports Lovin' Ladies!

CurlyQuills has launched her new line of Sports Chick earrings!  Now you can show your team spirit "a la mode".  Here's what Jamie has to say about her new line:

Rah rah ree! Kick ‘em in the knee! Rah Rah rass! Kick ‘em in the.... other knee!

While visiting family at my dad’s house over thanksgiving, I was immensely bored at the amount of football games he insisted on watching – it seemed as though there was a game on every minute of the day. While I sat at the dining table with various colors of paper strewn about, I decided to make football more enjoyable to me; a sports chick was born.

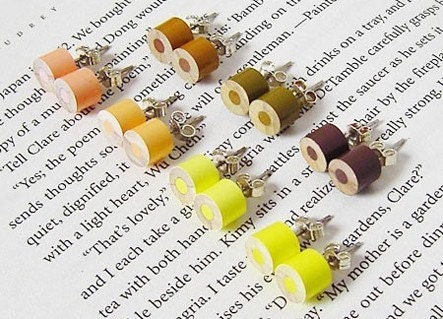
I began first by making blue (turquoise) and red, as well as blue and yellow. I believe it was a college game day, and Michigan was playing, so I started with their colors, and the colors of the rival team (which I can’t tell you the name of because I am not a football watcher). I then ventured on to other colors I could think of: red and white for the Detroit Red Wings, Green and White for Michigan State, and so on.


The majority of the earrings are named after people I know based on how they’re connected to each particular group of colors. For instance, my sister Abby is a huge Red Wings fan, my cousin Kelly loves the Detroit Tigers, and her sister, Carrie, and daughter, Peyton, have both attended Michigan State, and are big fans as well. Doni and Stacie both went to Central Michigan University and the list can, and will, go on and on.

The sports chick line will never stop growing, as there will always be another group of colors that work together for a particular team. If a color is not listed, send me a message and I can surely make them for you. I can also complete orders of multiple sets, as long as it is a reasonable number. Being a former high school cheerleader, I would have loved to wear these for game day, and I know there are others that would love to wear them for other sports to show their team spirit at a tailgating party.


The Sports Chick line of earrings can be found on Etsy at Curly Quills or on the web at www.curlyquills.com.

About the earrings:

Each set is made of two different colors of quilling paper (1/8” thick) with a black center (1/16” thick). They are made as a flower, and can have either rounded or pointed petals. The flower is about ¾” tall and wide; earrings measure approximately 1 ½” long. Each pair will ship in a 2”x3” white gift box.


Each flower is suspended from silver plated brass fish hook ear wires, connected with silver plated brass findings, and are sprayed with sealant for protection (note that earrings are NOT waterproof).

Upgrade to Sterling Silver or Platinum fishhooks for $2.00 more – please send me a message before placing order.

Wednesday, August 24, 2011

Yellow Circles Sunshine Happy Treasury!

Our team member, Barbasbeautys, was featured in a yellow circles treasury on Etsy!  This treasury is perfect for the sunworshippers of the world in my books! Babara's yellow and red circle necklace is stunning! Don't you think?

Monday, August 15, 2011

Going Digital with Paper Quilling

My name is Nicole, with CoCo’s Creations on Etsy. I make paper quilled embellishments for card making, scrap-booking, etc. For the last few years I have been wanting to go digital with my quilled embellishments to be able to expand to digital scrap-bookers. I have heard from many people that they love the look of paper quilled items, but they don’t like the bulk and thickness when using the items for scrap-booking.

So, I finally decided it was time for me to get going on making my items digital. I set forth to “roll out” my new digital products for my Christmas in July Sale.

Last January I got a Mac computer for my birthday, and I was given a version of Photoshop CS3. I had no idea how to use a Mac or how to use CS3. With help from a huge Photoshop Manual and friends who know Photoshop, I was able to use trial and error to figure it out.

My first dilemma, what is the best way to get the image into the computer? I tried scanning the image into the computer. The image was too straight on that every time I tried to erase the background, it erased parts of my object, because the paper is so thin. So, I tried taking photos with my camera. Seemed to work, but the lighting wasn’t right. I decided I needed a “photo light box” for my photos. The photos taken in the light box, using a small tripod to keep the camera still, were much better.


My next question was, what is the best way to erase the whole background from such an intricate item? I tried the lasso and the magnetic lasso, that was too difficult. I knew there had to be an easier way. I tried the magic wand, eraser, color range, extracting, etc. I think at this point, depending on what you are doing, and what you want for your finished product, these all work. You just have to find what works best for you. For me, the magic wand was the best.


The last question, and I am still trying to figure this one out, what color paper background to use depending on the color of the quilled item? A white snowflake cannot be photographed on a white background because there needs to be a contrast of color to be able to delete the background. Black is too dark to photograph a white snowflake, any light color reflects off the white quilled item, and anything other than a dark brown doesn’t work. I still can’t figure out how to photograph my snowflakes with the silver/gold edges with a background to actually work. But, my last findings with these, might work better being scanned.


Currently, I have finished 2 digital sets of Christmas items. Eventually, anything offered in my shop will also be offered digitally! Through trial and error, anything is possible!